Flags is a simple game which adds training elements to a throw around. It will expose your weaknesses and challenge your strengths. Set out two markers (water bottles are good) a few yards apart, one directly downwind of the other – these mark the goal line – the windier it is, the longer the goal line should be. The higher the skill of the players (and/or the lesser the wind), the narrower the goal line.
2 players: Throw from where you catch, don’t cut for throws but do move to catch them. (1) Throw over the goal line at any height, (2) Throw around the far side of the goal [OI], (3) Throw around the inside of the goal [IO]
3 players: 2v1 – Rolling defender, cutting now encouraged. All players can move freely and pass on either side of the flags, but only passes across the goal line (at any height) count as goals. Goals reset a shot clock to prevent stalling, and the shot clock can be counted by the defender from anywhere on the field.
Felix, Will and Edgars play 3-player Flags.
3v2 / 4v3: More players can be brought in both on offence and defence, and the goal widened.
Experiment with different goal sizes, goal orientation to the wind, restricting the surrounding space with back lines, and so on. I recommend stalling from 4-10, as this is most game-like – mimicking the common situation where a thrower looks for a secondary option at stall 3. Let me know if you come up with some interesting rules or modifications yourself! As it was written on the back of the first frisbee – Play catch. Invent games. Have fun.
More footage of Flags and how to set it up & play it — available for Training Tier patrons:
Be sure to also check out the Flexplanation page which includes videos of the basic concepts of Flex.
Considering sharing this page with your team? Before you do, please first read through the Hive Ultimate Content Sharing Policy, as this page is technically patrons-only.
Intro
Flexagon Defence is not a zone, nor is it strictly 1-to-1 defence. Flex employs local positioning guidelines to reduce offensive advantage wherever possible. Where zonal marking utilises role-based teamwork and dynamic positioning; 1-to-1 defence employs simple positioning rules and focuses on athleticism; Flex utilises a set of principles which encourage defenders to work as a team, dynamically recognising any offensive mistakes or inefficiencies and attempting to punish them to gain advantage.
In Ultimate, offence by default has a huge advantage, and if they play very well then it’s very difficult for any defence to stop them from scoring. Actively gaining advantage on defence requires the ability to recognise offensive mistakes, and then utilise a combination of teamwork, positioning, and athleticism to capitalise.
Basic Flex Movement Decision Tree
The 3 Flex Principles
Communicate
Switch / surround where appropriate
Cover all offensive players as a team
Communicate
Aim to open a communication channel with nearby teammates as soon as they are within range, so it can be used instantly when opponents move. There are three main ways of opening & using a communication channel:
eye contact – keep your head up – positional information is shared & acknowledged, chances for miscommunication reduced
gesticulation – keep your eyes open – pointing, indicating
vocalisation – keep your ears open – use names, inflection, and directional shouts to move teammates
See, sign, say. Opening a communication channel with your teammates ensures immediate feedback and facilitates learning from each play on the field. Communicating is a valuable skill which can be learned through practice, will help your team get on the same page, and fosters a growth mindset. As players become more familiar with each other, communication moves from vocalisation to gesticulation, and on to the point where simple eye contact will communicate a significant amount of information and initiate teamwork on defence.
Players and teams will naturally develop their own lexicon once they apply the Flex principles and make efforts to communicate. To read more about the specific words and phrases which we have found to be useful in Flex, see Advanced Flex Part II: Communication and Flex Part 4: Communication.
Switch / surround where appropriate
Proximity is the trigger you are looking for, to indicate switching/surrounding is appropriate
When facing a stack, use your communication channels and reposition as a team to surround
Surround with the same number of defenders as there are offensive players
The fewer players involved in the stack, the closer the defenders should position
Cutting players should be marked 1-to-1, whilst the remaining surrounding defenders reposition & tighten up to keep the stack covered
If there is space between all offensive players, and their movement cannot be punished with switches, mark 1-to-1 until the opportunity to switch or surround arises
Prepare to switch marks early – pre-empt offensive movement if possible, as late / reactive switches only limit damage – they do not necessarily gain advantage for the defence
Prepare to switch marks when opponents move towards occupied or busy areas
Switch if mutually beneficial for defenders, and both offensive players can be easier covered
Both players must move quickly to cover their new marks
Offensive players who are occupying the same space as each other, or moving towards occupied areas, are making mistakes – be prepared to punish them to gain advantage!
Cover all offensive players as a team
By default, Flex does not involve poaching. Poaching indicates an individual’s decision to leave their mark – this can be applied as an advanced or emergency tactic to good effect, but by default the defence in Flex involves coordinated teamplay, rather than individualistic poaches.
All individuals should be marking one specific player, or be part of a balanced surrounding setup
Surrounding setups should have equal numbers of offence and defence
Leave no offensive player unmarked
Get help if trying to cover two players
Avoid defensive double-coverage
Solo poaches send false signals to other defenders, and can cause a breakdown of Flex due to chain reaction
The offensive team have the same number of players as the defence – and one of their players isn’t allowed to move!
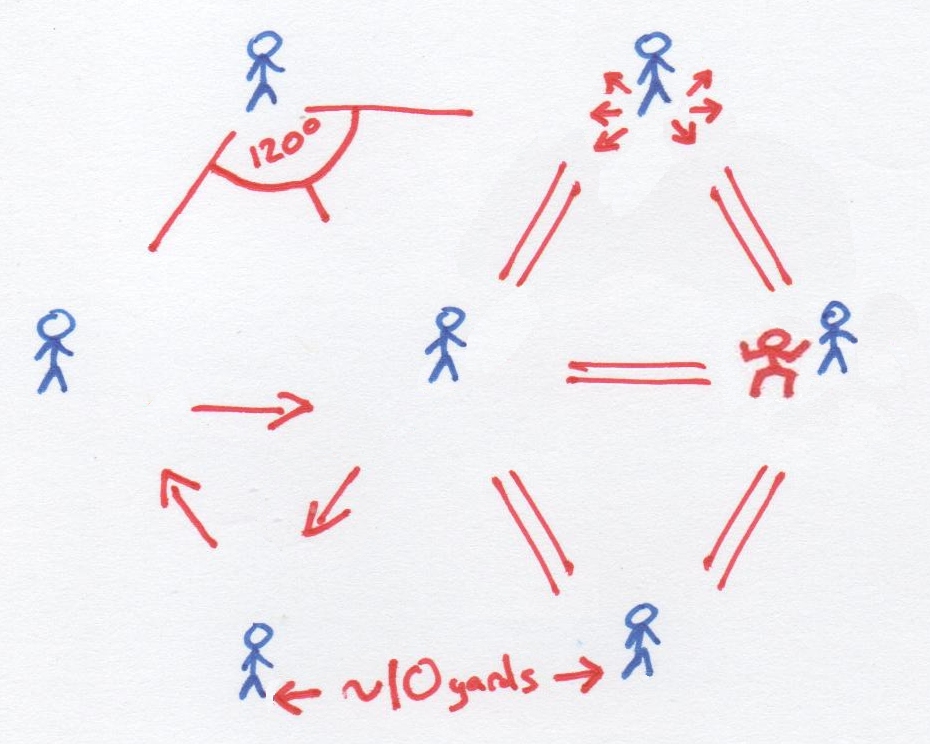
Global Positioning
Flex doesn’t really have a prescribed shape or formation, as the local positioning of the defenders is entirely dependant upon the positioning of the offensive players. If you find players are marking too much like 1-to-1, not looking for enough switches or surrounding opportunities, then players can be assigned initial positions. Players should be very willing to switch positions mid-point and stick with players 1-to-1 where appropriate, otherwise the defence turns into a zone / poaching, and many of the above principles are broken. Calling positions in Flex should be used as a tool to change the way your team is approaching the defence and get them playing more as a team – conversely, calling 1-to-1 matchups should be used as a tool to stop your players from poaching and apply more individual pressure. A well played Flex sits squarely in-between 1-to-1 and zone, adjusting as the situation dictates.
If the theory of both offence and defence in Ultimate are explored to depths, a hexagon (rotatable 2-3-2) shape emerges as most efficient use of space by 7 players. The hex shape is only utilised in Flex defence in three circumstances:
When playing against Hex offence – shape knowledge will help the defence to pre-empt offensive movement and punish positioning / movement mistakes
When the team are very experienced with playing Flex, and wish to employ more advanced ideas related to global switching & surrounding
If the defensive team are not switching or surrounding enough during normal play – calling initial positions can be useful as it puts defenders into a more ‘zone-like’ mindset, where they will be more actively looking to connect with team mates and essentially switch and surround the offence.
If a Flex team is surrounding too loosely, blowing switches often, or if poaching becomes an issue, calling initial match-ups on the line can encourage the defence to adopt a more 1-to-1-like mindset.
If calling positions, by default: 2 forwards, 2 wings, 2 backs, 1 hat (central player). If your opponent is playing horizontal stack it’s recommended you start with person-to-person marking, but if calling positions: 3 forwards, 2 wings, 1 hat, 1 back. For more on playing Flex against specific offensive strategies, see Advanced Flex Part I: Counter-Strategies The terms “forward” and “back” refer to how you see the field when on the line before a point – “forwards” are comparable to “handler marks”, “backs” are comparable to “deeps”. Remember that Flex is not a zone, and position calling should only be used in the three situations listed above.
The force – recommended: if the disc is near the middle force middle, if the disc is near the sideline force towards the line – this leaves defenders on either shoulder of the force in all situations. The force is not a critical part of Flex – it can often be left til last when making sure all offensive players are covered, and it can change depending on opponents / conditions. There should certainly not be a player chasing the disc and putting on multiple forces in a row (unless you have incorporated an advanced switching system into your Flex).
How to Train Flex
Understanding the theory is one thing, but training players to apply the principles in game situations requires focused work at trainings. Felix has been coaching these principles since 2012 and has a number of drills which are effective at developing players communication and field awareness skills so they can effectively switch and surround in game situations. The content is presented in a number of Flex drill videos, which are available on the $8 patreon tier.
Considering sharing this page with your team? Before you do, please first read through the Hive Ultimate Content Sharing Policy, as this page is technically patrons-only.
Optional video examples
Zoney Flex in action against FWD at Europeans – fast forward to 37:48:
More recently, Hammertron Prime played a zoney version of Flex at NZ Nationals 2019 (as well as playing Hex Offence):
GB Mixed U23’s played a zoney version of Flex at Worlds in 2015 – below is a video of the first time it was introduced to the team:
Hex/Flex in action against Japan at Worlds:
https://hiveultimate.com/wp-content/uploads/2021/02/spiral-01-887x1024.png00Felix Shardlowhttps://hiveultimate.com/wp-content/uploads/2021/02/spiral-01-887x1024.pngFelix Shardlow2017-03-23 11:40:592021-07-09 12:14:40Advanced Flex – Principles in Detail
This page is an old version, not all concepts are represented as clearly and concisely as in version 2.31!
Ultimate is a team-based field sport, and as such Movement, Positioning, and Technique/Skillset are the major elements for strategic consideration. Hex Offence’s movement is comparable to Spain’s tiki-taka quick passing style of soccer play. Hex’s positioning is spread like a network – maximising connections between players, and as such maximising options. Technique / skill sets which are suited to Hex include staying balanced and ready to throw or run anywhere at all times, communicating and reacting to your team mates, having spatial and field awareness, and being in control of your acceleration / deceleration at all times.
Hex can be explained through three simple principles:
1. Keep the disc moving (higher value than gaining yards)
2. Maintain the shape (a hexagon)
3. Create space for your team mates, use space as you see it developing
Abiding by these principles creates a fast-moving, flow-based offence which doesn’t give the defence a chance to set, maximises the offensive options available, constantly changes the angles of attack, and is a lot of fun to play.
1. Keep the disc moving – take the open pass
The flow chart in the video below is a guideline for the decisions you should be making on the field when playing Hex.
Ways this style of play differs from conventional offence:
Take the open pass regardless of field position, yardage, or stall count – if the open pass is behind you, take it. Don’t wait to see if there’s another open pass which can gain you yards, simply take the open pass you are aware of at that point in time. If you have an open pass on stall 1, don’t hold onto the disc to see if anything else will present itself later in the stall – simply take the open pass as soon as you see it.
Face infield – by facing towards the centre of the space, you are also facing towards the centre of the shape, so you are able to see open passes develop anywhere on the field at any time.
Aim to initiate & maintain flow – two quick passes can be enough to initiate flow, and once flowing, sustain it for as long as possible by continuing to take the open passes. Do not sacrifice flow in order to look for yardage gaining passes.
Faking
Some of the decision pathways above are yellow – this means an option isn’t definitely open, but it isn’t definitely marked out either. This could be due to a loose defender, due to not being confident with the type of throw or the distance involved, or any other reason the thrower isn’t totally happy with the option. In this circumstance, fake.
Faking should always be realistic and purposeful. There are three main purposes for faking, in order of importance:
a) To move downfield defenders around – if you have seen a potential option, then the good defenders on the field will also have seen it, so a realistic fake will get them committing to cover this option, and open up other options for the offence elsewhere on the field.
b) To communicate with your team – when you fake to a potential throwing option, you communicate to that player that you have recognised the option they are providing, but that you are not going to throw it for whatever reason. This serves as a prompt for them to provide an option elsewhere on the field. The rest of your team are also party to this communication, and should respond appropriately. An effect of a good purposeful fake is that the team are brought onto the same page, into sync, and are then able to establish a rhythm to their offence and control the tempo.
c) To move your mark – useful to make a particular throw easier, and often considered the primary reason for faking, sometimes fakes for this purpose are not aimed at viable options and thus can cause miscommunication and disconnection between the thrower and their team mates. When there are enough offensive options available, faking solely for this purpose is no longer productive.
2. Maintain the shape
In the Hex Movement Decision Tree, if you don’t have the disc in your hands then you must ask yourself “Am I in good hex shape?” – to know the answer, you must first know the shape!
Here is a video where I analyse an Australian team (Outbreak) playing Hex, with particular focus on how they should be maintaining shape during the possession.
The shape (a hexagon) stays the same regardless of the location of the disc – rotating as it nears the sideline in order to keep all players inside the playing field & away from the sideline, as illustrated here. The shape cannot and need not always be perfect during a point, but all players should make efforts and work as a team to maintain the shape when they can, especially if they are not involved in the immediate play.
Some guidelines to help with maintaining shape during a point:
Stay connected – when in good shape, each player is connected to (within 8-12 yards of) three team mates. The distance between any two players in the shape is guided by the team’s average throwing ability, or wind conditions – it should be a comfortable pass if the player moves towards the thrower as quickly as possible, or if they move away from the thrower as quickly as possible (a long pass). The three players connected to the thrower occupy the centre of the comfortable distances the thrower can pass, and keep the same distance away from each other.
Make triangles – the shape consists of six equilateral triangles, so if players focus locally on maintaining these triangles, the hexagon shape forms naturally.
Keep equidistant – locally, ensure the triangles are equilateral. These equal distances make it much easier to ensure everyone is connected, and to establish rhythm and tempo control as an offence, as well as setting a standard for pass-length that players can become familiar and comfortable with.
Avoid the narrow channel – when moving up past a player with the disc, take the path on the wider side of the field – avoid the space between the thrower and the sideline.
Don’t surround the disc – against person-to-person marking, surrounding the disc (i.e. having the thrower in the centre of the shape, or having a ‘reset’ on the opposite side of the disc to ‘cutters’) will often lead to turnovers and should be avoided. Against zonal defence, surrounding the disc can be beneficial.
Theoretical shape movement – without defenders, the most efficient way to advance the disc down the field whilst maintaining shape would be to pass the disc down the sideline whilst the hex rotates like a wheel rolling down the line – as illustrated in this animation.
In practice, defenders prevent the most efficient offensive movement, and so although globally the structure effectively rotates as it moves down the sideline, not all local situations will reflect this rotation directly, and players will interchange between positions regularly.
When the disc is passed forwards through the middle, players behind and lateral with the disc must push up to avoid surrounding the disc (whilst avoiding the narrow channel), as illustrated in this animation and this animation.
“Hexagon” technically refers to the shape used in this offence, which could be considered as separate to the disc movement, technique, and style of play this article lays out. For simplicity, I am combining the shape, the movement, the technique and the style in this article and under the name Hexagon Offence, as no other offences currently exist which use the Hex shape (though the positions in Frank Huguenard’s Motion Offence are similar). If plenty more Hex-based offences spring up over time then the combined ideas of shape & movement & technique/style may be renamed to something more personal, such as Shardlow Offence, Felix O, etc.
3. Create space for your team mates, use space as you see it developing
The final part on the Hex Movement Decision Tree reads “Can you create useful space for a teammate?” – knowing the answer to this requires having good spatial and field awareness, and understanding how your teammates can use space which you create. Keep you head up and always be aware of where the defenders and the offensive players are positioned, and, if appropriate, move accordingly. You can create space for your teammates even when you are closely covered, and it is acceptable to distort the shape in order to generate an option.
As space opens on the field, make use of it by moving into it. This also helps your team maintain shape. Take what your defender gives you, or make them give you something you want.
Here’s a clip of UK team SMOG playing Hex at Windmill 2018, where they are applying most of the principles explained above fairly well:
Scoring
Scoring in all Ultimate usually happens in one of two ways: (1) from a deep throw, or (2) from flow towards the end zone. When the disc is around the area of the brick mark, the deep throw is a significant threat, so defenders must not allow the offence players to streak free towards the zone. This allows the offence more chances to be free coming back towards the disc, for shorter passes which can be used to initiate flow. Hardly any turnovers happen when the disc is thrown from near the brick mark.
As the disc gets closer to the end zone, the deep throw is no longer a threat, so the defence can apply more pressure to shorter passes. When flow stops outside the end zone, the odds of the offence scoring decreases significantly.
When in this situation, it is still relatively easy for the offence to initiate flow – if they are moving away from the end zone. The offence should coordinate flowing away from the zone – towards the brick mark – whilst vacating all players from the end zone (staying connected), as this will quickly open up the deep throw again as an immediate scoring option, and put them in a good position to direct their flow back towards the end zone.
The ideal distance to which you should flow away from the end zone depends on the players on your team – far enough so that all defenders are out of the end zone, but not so far that your players cannot reach the end zone with a long throw.
Resources
felixultimate Patreon – Hex training videos released each month to Roo tier patrons, access to livestream analysis archive for all patrons, pledge any amount!
Training Hex Offence with your team – contains some diagrams & descriptions of drills, and tips on how to introduce the offence to your team. Mex Offence v2.1 – an older version of this doc – more verbose.
Full game footage of Hexagon Offence being played is available at pushpass.co.uk – see any of Brighton City’s games from UKU Nationals 2012/13/14, XEUCF 2013, EUCF 2014, or any Sussex Mohawks 1 or Brighton Panthers games from Uni Regionals 2014. For clips of Hexagon Offence see the Hexagon Ultimate YouTube channel – here are some samples from the channel of Hex in action, taken in 2013.
NB: The play in these videos is by no means a perfect display of Hex, and in the football ones I did get a bit overzealous on drawing triangles over the pitch…
I asked Mario O’Brien what he thought of Hex strategies and had some positive back-and-forth with him. Mario is the Founder/CEO of RISE UP Ultimate + ULTACADEMY; Seattle Sockeye & Cascades O-handler; 2-time Manager Team USA Beach; SOTG gold medalist; International and local coach; and Team ERIC Coach), and he recently did an “Ask Me Anything” on /r/ultimate/:
Chatting to Mario helped me clarify my thoughts on & for the first time verbalise how poaching causes the progressive collapse of Flex D. I’ve now incorporated this specific example into the Flex theory clinic – it now feels like there is a frame in place, and we’re no longer fumbling in the dark trying to figure out & define ‘smart defence’; we’re working out what fills the frame & where the holes are. The task for the first time feels relatively finite.
I’ve got a lot of time for Sockeye – I hung out with them a little in Prague during WUCC 2010, I love a team that knows how to play hard, party, and isn’t afraid to innovate on the field and openly discuss new strategies and tactics.
https://hiveultimate.com/wp-content/uploads/2021/02/spiral-01-887x1024.png00Felix Shardlowhttps://hiveultimate.com/wp-content/uploads/2021/02/spiral-01-887x1024.pngFelix Shardlow2016-09-26 10:22:142017-11-03 11:42:12Chat with Mario O’Brien
For the first 3 seconds of the stall, the offence is looking for flow or continuation options. If the offence is playing well, these options are hard to prevent – nearby defenders should make efforts to contain the offence and prevent flow (or predict it and get a block), whilst other defenders not connected to the play should focus on establishing good positioning. If flow is halted and the stall count hits 3 seconds, the offence will look for a secondary, or reset option. At this point, the defence should already be working as a team to pressure these next options – using switches and sandwiches to ensure every player is marked with good positioning when the thrower looks up after 3 seconds.
With flow halted, if the PoNY defenders used a switch or a sandwich then the clear cutting option would have been denied, and the reset would have been marked quickly.
After stall 6, the offence will look for their reset or backup options, like a hammer, a break, or a yard-losing pass. All defenders should be minimising separation, or be sandwiching any offensive players who are near to each other – working together to be tight enough to all offensive players to apply pressure to the break/overhead/yard-loser that will be considered at stall 6. Reaching stall 6 doesn’t happen all the time, so the defence can afford to put in extra effort when it does.
Flow is stopped, the thrower looks at their reset at stall 3, they are marked out, so further options are looked at at stall 6. If the defence positioned themselves effectively as a team, the thrower would likely be left with no easy option.
If the defenders are all conscious of when the stall count reaches 3 seconds during a point, they can focus their efforts in a coordinated way – using teamwork to attempt to punish the slight offensive error of flow having stopped. By all being on the same page with regard to when / where they should be expending effort, the defence can save energy for the moments when getting interceptions are most likely, and then focus their efforts to generate a block as a team.
Defenders are positioned well and heads-up to switching to limit options. Tightening up late in the stall reduces the chance of flow being re-started after the disc is passed (sustainable defence). The defender with yellow shorts initially stifles the offence, but is a second late in tightening up.
The Force should be ‘loose-tight-loose’ over the 10 seconds of the count – for stalls 1-3, the force should be loose and containing – ready to switch to prevent a give-go or up-line cut, and also preventing a ‘killer’ break throw or penetration move.
Stalls 4, 5 and 6 are when the force should be tight and aggressive – stopping the first ‘alternate look’ from the thrower, and applying pressure.
Stalls 7, 8 and 9 are when the force should loosen up a little again – preventing a ‘killer’ break throw and not allowing the thrower to draw a foul to reset the count.
Downfield Defenders should play tight-smart-tight against cutters – they should aim to be tight to their mark when the disc is caught (stall 0), then, if flow is halted, they should be smart and look for sandwiches / switches on stalls 3, 4 and 5, and if the disc still isn’t passed then they should make sure they are tight again at the end of the stall count when the thrower will be looking for the offensive player with the most separation to create an option.
La Flexagon appréhende la défense sous un nouvel angle, en combinant des éléments de défense individuelle et de défense de zone. La Flex n’est ni une « indiv » ni une « zone », c’est un hybride avec ses propres règles et principes. À l’ultimate, l’attaque a l’avantage, et prendre l’ascendant en défense requiert une combinaison d’athlétisme, de positionnement et de travail d’équipe. La défense individuelle est orientée vers l’athlétisme et la zone sur le positionnement, la Flexagon quant à elle met l’accent sur le travail d’équipe avant de capitaliser sur tout mouvement ou positionnement inefficace de l’équipe en attaque
Les 3 Principes Flex
Communiquer
Eye contact – rester en alerte
Utiliser des gestes
Utiliser des mots
Switcher / Encadrer avec un partenaire lorsqu’approprié
Être prêt à changer de marque (switcher) – anticiper les déplacements de l’attaque si possible
Ne jamais laisser le joueur sur lequel vous défendez sauf avec la certitude qu’il sera couvert, et si vous savez sur qui vous devrez défendre dorénavant
Encadrer (« sandwicher ») des joueurs près l’un de l’autre
Couvrir tous les attaquants en équipe
Chaque défenseur doit marquer un joueur spécifique sauf si encadrement (ne pas défendre un espace ou une position)
Ne pas laisser d’attaquant non défendu
Recevoir de l’aide si vous essayer de défendre plusieurs joueurs
Éviter les surnombres défensifs
Positionnement
Les positions sont grandement flexibles parce que largement dépendantes des positions prises par les attaquants, cependant la structure sous-jacente peut être décrite comme un 2-3-2.
2 forwards (avants)
2 wings (ailiers)
2 backs (arrières)
1 hat (joueur central)
Les termes de « forward » et « back » font référence au sens dans lequel vous voyez le terrain avant un point; les « forwards » sont comparables à des « défenseurs de handlers », et les « back » à des « deeps sur une défense de zone »
Les positions peuvent et devraient changer durant une possession ; fréquemment il est plus logique pour un défenseur de suivre sa marque tandis qu’il se déplace sur le terrain plutôt que de switcher ; les autres défenseurs doivent s’ajuster en fonction. Un défenseur peut débuter un point en tant que « back » et finir « forward » en passant par « hat ». Respecter les principes rend ces changements de postes dynamiques possibles.
La force, si le disque est près du milieu alors la force est « middle », si le disque est près d’une sideline alors la force est « line », ça laisse des joueurs de chaque côté de la force dans les deux situations. Ce n’est pas systématiquement un « forward » qui place la force, quand le disque est près d’une ligne il est plus probable qu’un « wing » s’en occupe, selon les positions occupées par les joueurs sur le terrain.
Switcher / Sandwicher
Quand les attaquants sont proches les uns des autres, ils ne sont pas positionnés efficacement, et la défense se doit de punir cela en les encadrant (“sandwitchant”) tout en Assurant d’être autant de défenseurs qu’il y a d’attaquants. Si au contraire les attaquants sont répartis sur le terrain en utilisant l’espace à leur disposition, une défense serrée est plus adaptée. Il ne faut pas tenter de sandwicher.
Lorsque des attaquants se déplacent l’un vers l’autre ou vers les défenseurs, la défense doit punir ces mouvements inefficaces en switchant leur marque. Cela conserve l’énergie et créer des opportunités de block puisque le défenseur arrivera d’un angle inattendu. Si les attaquants se déplacent vers un espace il n’est pas conseillé de switcher.
Vous souhaitez des vidéos montrant la Flex en action, ou des explications orales et autres? Restez informez en souscrivant à Hexagon Ultimate YouTube channel.
La Flex en action face à FWD aux championnats européens – avancez jusqu’à 37:48:
GB Mixed U23’s utilisa cette défense aux mondiaux 2015, plus de vidéos de Felix expliquant la Flex à l’équipe seront uploadées sur la chaine Hexagon Ultimate sous peu (en dessous une vidéo de la première fois que cette défense a été présentée à l’équipe).
La Hex/Flex en action contre le Japon aux mondiaux:
Good communication within a team is essential for good teamwork, combined with trust in your team mates communications. When you receive communication from a team mate, you should immediately act on it, and then re-assess the situation. Very rarely should communication from a team mate be assessed before being put into action.
Communication should be near-constant during a point of Flex, when team mates are within range of each other. If any of the principles are being disobeyed then there should be a lot of noise on the field – if an offensive player is unmarked, all defenders should know about it and be working together constantly to remedy the situation. If it’s becoming possible to surround the opposition, or if their positioning indicates a switch may be possible soon, communication should already be happening.
The 3 ways to communicate in Flex
Eye-contact – opens the channel of communication between two defenders
Gesticulation – directs attention to a particular area or person
Vocalisation – gives detailed information or instructions
Eye-contact between defenders should happen whenever they have the opportunity – usually when their marks are not moving and they are re-assessing the situation. A moment of eye-contact has multiple immediate benefits:
Communication channel is opened. If there is anything you or your team mate wish to communicate to each other, you have each others attention so are able to do so, through facial expressions, gesticulation, or vocalisation. A neutral look saying “everything is OK” is useful in itself.
Each defender gets knowledge of their teammate’s position, and the position of their teammate’s mark. They also know that their teammate is aware of their situation – which pre-empts opportunities for switches or sandwiches.
Defenders are put “on the same page”. The chance for miscommunication is minimised, and a good base for teamwork is established.
Gesticulation conveys more specific information, and can be recognised by many defenders at the same time. Usually the meaning of any gesticulation is self-explanatory when combined with player movement – here are some examples:
Pointing to an offence player or players – depending on the context, this can either mean you are marking them, or that your team mate should mark them. Pointing to two or three players (by using two or three fingers) is a quick way of initiating a surrounding setup with teammate(s).
Open-hand gesturing can be used to indicate what area you are covering in a surrounding setup, and to move defending team mates around to improve coverage.
During a switch, pointing is best used to indicate the player you are leaving (who your team mate should immediately mark tightly), but can also be used to indicate the player you are picking up. Your movement serves as an instant clarification – the fact that you are making an effort to communicate indicates to your teammate that they should react to your movement.
Vocalisation is the most flexible form of communication, and can be reach all defenders within earshot, essential when they are occupied or when their back is turned. Any information conveyed vocally also carries with it information about where on the field the shout is coming from, and the tone / volume of the shout indicates the level of urgency. Shouts should be accompanied by gesticulation where possible, to give more specific information to team mates who have you in their field of view, or who turn to look when they hear the shout. Here are some shouts which have proved to be useful in Flex:
“[name]” / “yours” / “mine” / “I’m here” / “you’re there” – most direct way to get a teammates’ attention is to shout their name, when combined with gesticulation the intention is usually clear. Other short phrases are used to clarify basic responsibilities quickly, and to let your teammates know you are prepared to switch or surround.
“1”, “2”, “3” etc – indicates the number of offensive players you are covering. If the player you are marking is isolated or you wish to stick 1-to-1 to them for any other reason, a shout of “1” will clarify this with your team mates. If two offensive players are positioned in close proximity, a shout of “2” indicates the defence can form a two person bracket, and should be echoed with a “2” shout from the other defender. Similarly, a shout of “3” or more should be echoed by the other defenders who are involved in the surrounding setup.
“Count” – if defenders are being too quiet in a surrounding setup, and you are looking for reassurance that they are on the same page, “count” encourages them to assess the situation and shout a number (even if they decide on “1”).
“Surround” – as soon as you notice an opportunity to surround, bring it to everyone’s attention.
“Push” – used to move nearby defenders away from you. This is useful when you realise you are both covering the same space, when the surrounding setup needs to be adjusted, or when you see an unmarked offensive player the other side of a team mate. When you hear “Push”, you should initially move directly away from where the voice came from, before reassessing the situation. Example animation here.
“Pull” – the opposite to ‘Push’, use “Pull” when you want defenders to come towards you, or to an area near you. This is useful when you find yourself covering two or more players, or when you can see an unmarked offensive player nearby. When you hear “Pull”, you should initially move towards where the voice came from, before reassessing the situation. Example animation here.
“Left/right” – can be used to move a team mate when you are out of their line of sight. If a team mate has their back to you, your left is their left, so directing them with left/right shouts is relatively straightforward. When they are facing you, gesticulation is more effective. Left/right shouts are also useful for communicating with the force.
“Switch” – a ‘switch’ call is common and used when two defenders wish to swap their marks. Switches are ideally called when you know (a) who your new mark will be, and (b) that your old mark will be covered, and often the movement to cover a cut will happen before the utterance of “switch”. Silent switches should be avoided, unless they are pre-empted.
Sideline
Most communication in Flex is done on-field because everything happens so quickly and dynamically. There are a number of ways the sideline can help:
Up shouts for every pass. The length and tone of the “Up” shout can help convey the type of pass made. This is very useful for players who aren’t in a position to actually see the pass being made – it lets them know the angle of attack is changing, the stall count is resetting (see Advanced Flex Part IV: The Stall-3 Game Changer), and that the disc is momentarily in the air so an immediate throw is not possible (a good opportunity to check disc position).
Identify and alert players to any situations where an offensive player is left unmarked, a surrounding setup is unbalanced, or a defender is marking two players.
The thrower’s focus – let the defender nearest to where the thrower is focusing their attention know that the thrower is looking, so they can be extra vigilant. Shout the name of the defender of the next player you think will be looked at.
High stall counts – lots of noise & “here it comes” from the sideline to let defenders know a pass is coming very soon, so they should tighten up to their mark and be ready for the unexpected. See Advanced Flex Part III: The Stall 3 Game-Changer to learn more about how the defence should change the way they are marking depending on the stall count.
https://hiveultimate.com/wp-content/uploads/2021/02/spiral-01-887x1024.png00Felix Shardlowhttps://hiveultimate.com/wp-content/uploads/2021/02/spiral-01-887x1024.pngFelix Shardlow2016-05-04 12:47:522021-07-09 10:08:47Advanced Flex – Part II: Communication
If the opponents create a tight vertical stack, you should surround the stack.
The 5 players guarding the stack are basically playing a 5v5 surrounding game. When an offensive player cuts out of the stack, a defender marks them tightly, and the other defenders communicate and reposition to account for the fact it’s now a 4v4 situation. This transition happens as soon as there is space between the offensive players, and the sandwiching/surrounding players in the 4v4 should continue to be ready to switch with the defender in the 1v1 – for example if the offensive player cuts deep for a few steps and then comes under, a defender towards the front of the stack should be prepared to switch onto the isolated cutter if appropriate.
At the front of the stack, the defender on the break side should be marking tight to the front, whereas the defender on the open side can take a few steps off. This prevents the quick pass to the break side, and puts the open side defender in a good position to mark whichever player cuts open side first.
The faster the defence can reposition after each cut, the less chance the offence has to exploit holes in the setup. Avoid having two defensive players mark one cutting player, as this creates an unbalanced sandwiching situation (e.g. 3v4), which is a weakness for the defence.
The players marking the stack can choose to split duties, for example from a 5v5 sandwich, into two sandwiches – 2v2 and 3v3. They might choose to do this in the case of a pre-existing imbalance, such as the offence having a few ‘superstar’ players, or when playing mixed gender ultimate.
As players clear out and rejoin the stack, the 1-to-1 defenders should rejoin the surrounding setup. As the number of players in the stack reduces, the surrounding defenders should tighten up – when there are only 2 players in the stack, the defenders should only be a couple of steps away from them, but when there are 5 players in the stack, the defenders can be five steps away.
Flex vs Horizontal Stack
Horizontal stack from the centre of the field has fairly good spacing, so an initial surrounding setup is not appropriate. Trying to have a deep & under poach when the disc is in the middle of the field leaves the offence with too much space, which they can use to split defenders and create separation. Defenders should start tight to their marks, and look for switches after the first cuts are made. The typical peppermill or diamond cutting patterns from horizontal stack have a weakness which can be exploited through proactive switching – more details on how to train players to spot these opportunities is in an $8 Training Tier video – the Conical Switching Drill.
If the disc is being brought into play from the sideline, the two deepest offensive players on the far side are so disconnected from the play that it is possible to bracket them effectively.
Flex vs Side Stack
Similar to marking vert stack, but use the sideline as your friend as the offence can’t cut in that direction. Advanced: nominate a deep poach who is looking to help out when an isolated cutter goes deep. The fact that the defenders have to cover 50% fewer angles from the stack means that the defence can afford to have one defender leaving the stack to stifle the space deep. This is not strictly part of Flex defence, but a specific poaching tactic which can be used effectively against side stacks. Communication and awareness of all the defenders on the field will have extra challenges when a deep poach is added, as when the stack breaks down the poaching defender needs to find their mark, and the defenders marking the stack are outnumbered.
Flex vs Stack in the endzone
When the opponents work the disc up the field against Flex and approach the end zone, often they will transition into a vertical stack to try to open up the space. Flexing defenders should automatically surround this stack as they would against a typical vertical stack offence, overloading the front slightly more than usual, stifling the space, and generating confusion & chaos.
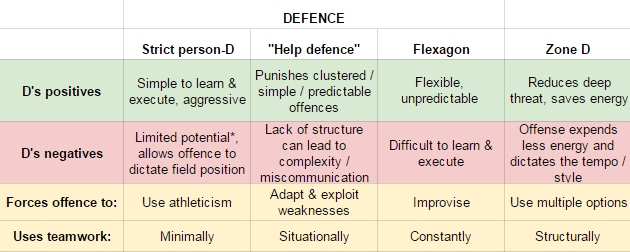
In this article I will be seeing how a selection of common offences match up to a selection of common defences in Ultimate, and whether any conclusions can be drawn about the most effective offences / defences for teams to spend time learning in order to efficiently counter their opponents’. When planning what strategies your team should learn in any given season, it’s important to know what their strengths and weaknesses are, and how they are most likely to be countered effectively by your opponents.
The strategies listed are by no means exhaustive – every strategy has several different ways of being played, several tweaks or modifications, several patterns or plays which can be employed – none of which are touched on here, for the sake of simplicity. Environmental factors are not considered, “match-strategy” is not considered (e.g. come out more aggressive at the start of a match; change your defence regularly), skill-sets of teams or individual players are not considered, and different teams will have experienced different levels of success with the strategies listed – these estimates and statements are generalisations, made in order to achieve some kind of tangible comparison between the offensive/defensive strategies based on their merits and drawbacks.
I’m working with four offences and four defences: Vertical / side / split stack offence: Players line up in the centre or at the side of the field, and make hard ‘cuts’ to the space available, before ‘clearing’ back into a stack. One player stays behind the disc as a dump/reset. Horizontal stack: Players create a 3-4 formation (3 backfield, 4 downfield), with the downfield players either cutting towards or away from the disc. Hexagon offence: Players form a hexagon made from equilateral triangles, often in a 2-3-2 formation, with movement creating space for passes in any direction. More info on Hex offence here. Zone O: Varies from team to team, but usually 3 or 4 players in the backfield, who swing the disc from side to side, looking to pass downfield to ‘poppers’ attacking the space in front of the disc, and wings or deeps further downfield.
Strict person-D: Each defender marks an offensive player, staying very close to them for the duration of the offence. The side the defender tries to hold position on their mark is determined by the direction of the force put on the thrower. “Help-defence”: A modification of person-D where the defenders are heads-up to switching marks and helping covering dangerous space when appropriate. More info on Help-defence here. Flexagon: A hybrid defence, taking elements from person-D and Zone, to apply pressure to all players by using constant teamwork and communication. In theory a 2-3-2 setup, but actual positioning is entirely dependant upon where the offensive players are. More info on Flexagon D here. Zone D: Defenders spread over the field to cover the space, usually overloading the area in front of the thrower to limit short downfield throwing options. There are many types of Zone D, this article does not distinguishing between them (for simplicity).
* a note about strict person-D: although much pressure can be applied by playing this defence with smart local positioning and trained athletic moves, I see the strategy as limited due to (a) the absence of teamwork between downfield defenders, and (b) the over-reliance upon matching or surpassing your opponents athletically.
Calibration:
The table below compares each offence against each defence. The numbers are scoring likelihood / defence likelihood estimates, assuming two high-to-elite level teams are competing with well-practiced offences vs well-practiced defences. For example, assume the (very common) combination of Vertical stack vs strict person-D would see the offence scoring without turning over 85% of the time – use this as calibration for the other numbers, whether or not you agree with the figure! This is roughly the same for Horizontal stack vs person-D, and for Zone O vs Zone D – these combinations are generally considered comparable with each other in terms of effectiveness, as they are the most commonly played.
“Help-defence” is more variable than the others, as it depends a lot on how well it is played by the defence, and how well the offence adapts – so I’ve given the numbers a range.
Hexagon and Flexagon are quite new strategies, so the estimates are more likely to be inaccurate, however they are taken from 2-3 years of regularly teaching and playing the strategies – including with the GB U23 Mixed 2015 team.
All the numbers are rough estimates of likelihood, and the relative effectiveness of each strategy will certainly vary from team to team, and depending on how each is played!
From an offence point of view:
vs Strict person-D, it’s best to get defenders clumping together (covering the least / most useless space), so a vertical or side stack is ideal, and horizontal creates a large deep space. Hex spreads the defenders out, meaning the D actually becomes more efficient. vs “Help-defence”, defenders who are clumping together will be able to poach/switch to help each other, so vertical stack becomes less effective. Horizontal spreads the defenders well, making it hard for them to help each other effectively – especially when it comes to covering the immediate deep threat. Hex spreads the defenders further and punishes poaching more efficiently, but doesn’t offer the immediate deep threat of Horizontal. vs Flexagon, vertical stack is negated, and Zone O doesn’t function well due to the tight marking against static players. Any set cutting patterns of plays are unlikely to work, so Horizontal stack and Hexagon must improvise in order to function. Improvisation is easiest done when the number of available options is maximised, so Hex is the ideal setup. vs Zone D, stack offences are negated. Zone O and Hex have both been shown to be effective at breaking down area-based (zonal) defences, so should be played to counter Zone D.
From a defence point of view:
vs Vertical / Side / Split stack offences, the offensive players are clumping, so strict person-D plays to their strength (clumping your defenders together and leaving large open spaces), whilst Zone or Flex will force them to transition into another offence. Help-defence punishes the clumping, which encourages the offence to improvise, and can generate turnovers when played well. vs Horizontal stack, the offence is more spread, so help-defence is harder to implement. Strict person-D is moderately effective as usual (depending on your athleticism vs theirs), but Zone D or Flexagon will force the offence out of any pattern- or play-based movement. vs Hexagon, simple person-D can cause issues, specifically if you are more athletic than your opponents. Help-defence is easier punished by Hex than other offences, but can force the offence to use all their options. Traditional zones don’t change the formation of the Hex, but can force a different play-style which the offence may not be used to. Flexagon applies pressure to the highest number of options, forcing the offence to improvise – meaning any set patterns or plays become unreliable, and players must identify space for cuts and passes as and when they appear. vs Zone-O, the offensive players are looking for space to occupy, so person-D will force a transition. Zone D conserves the energy of most defenders, however Zone O will be well-practiced against Zone D. Flexagon is more person-focussed, which forces Zone O either to transition or to improvise – to play at a different pace/tempo than they are used to in Zone O.
Summary:
From an offence point of view: The most common defence is strict person-D, and the most common offence – vertical stack – does well to exploit strict person-D’s weaknesses. If the defence start switching and poaching (“Help-defence”), then the offence must start to improvise, and would ideally be able to counter with a practiced Horizontal stack or Hexagon offence. If facing Flexagon, offensive improvisation from a Horizontal / Hex / Zone O setup is necessary. If the defence play Zone, then the offence must respond with a practiced Zone O or Hexagon offence. From a defence point of view: The most common offence is vertical stack, which plays to the weaknesses of strict person-D. Playing Flexagon or a Zone D will force the offence to transition – and you will see if they have a practiced alternative. Zone O can be countered effectively with person-D or Flexagon, which forces the offence to either completely improvise, or to play Horizontal stack or Hexagon offence. Flexagon still functions well against these offences, as does person-D – providing there is no athletic disadvantage.
Conclusion:
From an offence point of view: Time spent perfecting a vertical stack offence can be made to be ineffective if a defence plays anything other than strict person-D. Training an offence which works against Zone (i.e. Zone O or Hexagon offence) is essential. If your opponents have good “Help-defence” or Flexagon D, then you must either be able to improvise, or transition to Horizontal / Hexagon in order to keep your scoring percentages up. Horizontal must transition when facing Zone, but Hexagon can be played effectively against any defence you face – even though it may not necessarily be the most effective against any defence individually. Your team can function against any defence if they know both Horizontal (with improvisation) and Zone O, or if they simply know Hexagon offence. To be the most effective, a team should also learn an offence which punishes strict person-D more efficiently – vertical- or side-stack. From a defence point of view: Strict person defence is simple to learn and functions against any offence, but its success is determined by the athletic edge you have over the opponent, and limited by the lack of teamwork involved. If you have an athletic edge over almost every opponent then strict person-D can get enough turns to win games, but only until you reach an athletically superior team playing a well-practiced offence, or until your own offence is countered. Learning a more challenging defence, particularly one which counters the most common offence – vertical stack – is essential, unless you are fully relying on your athleticism or your offence.
“Help-defence” is hard to learn and implement due to its lack of structure and principles, and it is most useful against vertical stack – less so against Horizontal or Hex. Zone D completely counters vertical and other stack offences, however most teams have a well practiced Zone O which will counter it well. Although Flexagon is also hard to learn, it is flexible enough to be played effectively against any offence you face, countering the most common vertical stack and Zone offences effectively.
https://hiveultimate.com/wp-content/uploads/2021/02/spiral-01-887x1024.png00Felix Shardlowhttps://hiveultimate.com/wp-content/uploads/2021/02/spiral-01-887x1024.pngFelix Shardlow2016-04-06 00:36:152017-11-03 11:46:39Offences vs Defences: Training to counter your opponent effectively
https://hiveultimate.com/wp-content/uploads/2021/02/spiral-01-887x1024.png00Felix Shardlowhttps://hiveultimate.com/wp-content/uploads/2021/02/spiral-01-887x1024.pngFelix Shardlow2016-04-06 00:34:402021-07-15 09:03:16Training Hex Offence with your team

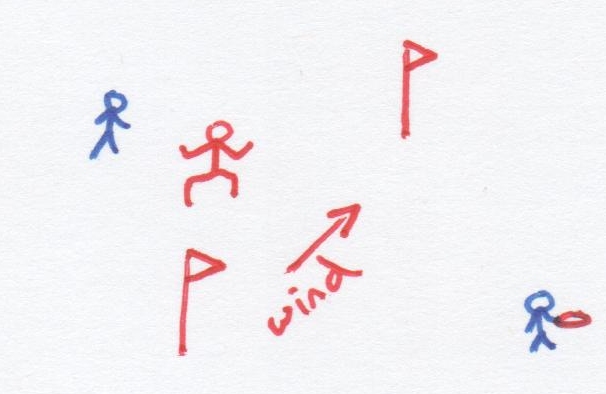 Flags is a simple game which adds training elements to a throw around. It will expose your weaknesses and challenge your strengths. Set out two markers (water bottles are good) a few yards apart, one directly downwind of the other – these mark the goal line – the windier it is, the longer the goal line should be. The higher the skill of the players (and/or the lesser the wind), the narrower the goal line.

 The shape (a hexagon) stays the same regardless of the location of the disc – rotating as it nears the sideline in order to keep all players inside the playing field & away from the sideline,
 I asked Mario O’Brien what he thought of Hex strategies and had some positive back-and-forth with him. Mario is the Founder/CEO of RISE UP Ultimate +


Chatting to Mario helped me clarify my thoughts on & for the first time verbalise how poaching causes the progressive collapse of Flex D. I’ve now incorporated this specific example into the Flex theory clinic – it now feels like there is a frame in place, and we’re no longer fumbling in the dark trying to figure out & define ‘smart defence’; we’re working out what fills the frame & where the holes are. The task for the first time feels relatively finite.
I’ve got a lot of time for Sockeye – I hung out with them a little in Prague during WUCC 2010, I love a team that knows how to play hard, party, and isn’t afraid to innovate on the field and openly discuss new strategies and tactics.
To read Mario’s full AMA click here, and be sure to check out his new ULTACADEMY project.