
Hexagon Offence v2.21
v 2.21 – 31st August 2018
Concept first published 1st Jan 2013
Also available in French / en Français (v2.1)
Note: Updated (2020) documentation here: https://felixultimate.com/2018/10/14/hexagon-offence-v2-3/
This page is an old version, not all concepts are represented as clearly and concisely as in version 2.31!
Ultimate is a team-based field sport, and as such Movement, Positioning, and Technique/Skillset are the major elements for strategic consideration. Hex Offence’s movement is comparable to Spain’s tiki-taka quick passing style of soccer play. Hex’s positioning is spread like a network – maximising connections between players, and as such maximising options. Technique / skill sets which are suited to Hex include staying balanced and ready to throw or run anywhere at all times, communicating and reacting to your team mates, having spatial and field awareness, and being in control of your acceleration / deceleration at all times.
Hex can be explained through three simple principles:
1. Keep the disc moving (higher value than gaining yards)
2. Maintain the shape (a hexagon)
3. Create space for your team mates, use space as you see it developing
Abiding by these principles creates a fast-moving, flow-based offence which doesn’t give the defence a chance to set, maximises the offensive options available, constantly changes the angles of attack, and is a lot of fun to play.
1. Keep the disc moving – take the open pass
The flow chart in the video below is a guideline for the decisions you should be making on the field when playing Hex.
Direct link to the Hex Movement Decision Tree image
Ways this style of play differs from conventional offence:
- Take the open pass regardless of field position, yardage, or stall count – if the open pass is behind you, take it. Don’t wait to see if there’s another open pass which can gain you yards, simply take the open pass you are aware of at that point in time. If you have an open pass on stall 1, don’t hold onto the disc to see if anything else will present itself later in the stall – simply take the open pass as soon as you see it.
- Face infield – by facing towards the centre of the space, you are also facing towards the centre of the shape, so you are able to see open passes develop anywhere on the field at any time.
- Aim to initiate & maintain flow – two quick passes can be enough to initiate flow, and once flowing, sustain it for as long as possible by continuing to take the open passes. Do not sacrifice flow in order to look for yardage gaining passes.
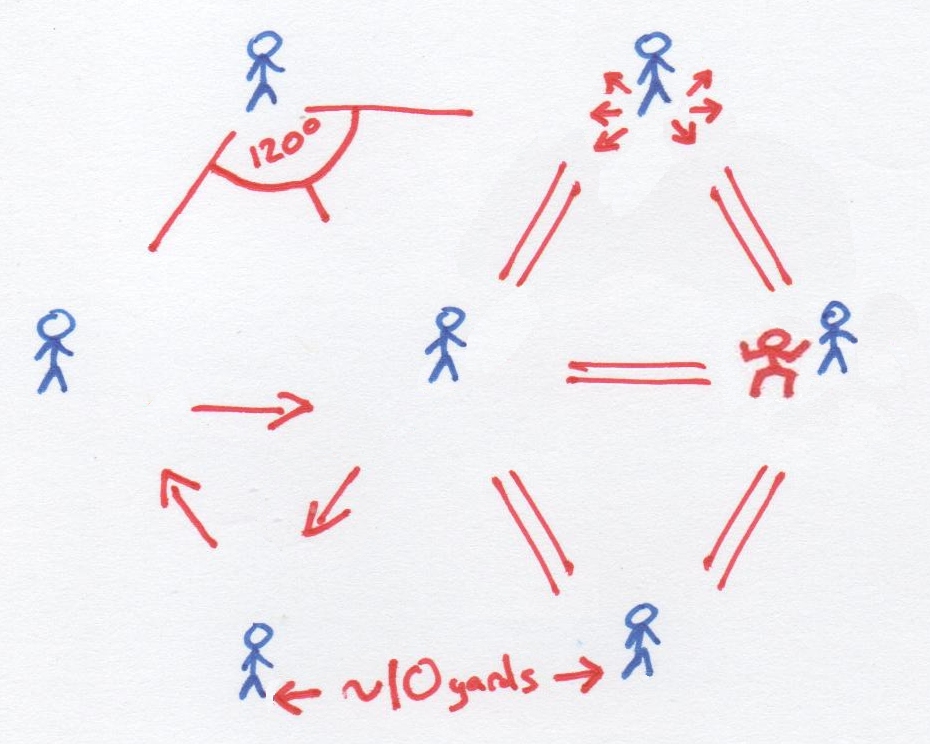
Faking
Some of the decision pathways above are yellow – this means an option isn’t definitely open, but it isn’t definitely marked out either. This could be due to a loose defender, due to not being confident with the type of throw or the distance involved, or any other reason the thrower isn’t totally happy with the option. In this circumstance, fake.
Faking should always be realistic and purposeful. There are three main purposes for faking, in order of importance:
a) To move downfield defenders around – if you have seen a potential option, then the good defenders on the field will also have seen it, so a realistic fake will get them committing to cover this option, and open up other options for the offence elsewhere on the field.
b) To communicate with your team – when you fake to a potential throwing option, you communicate to that player that you have recognised the option they are providing, but that you are not going to throw it for whatever reason. This serves as a prompt for them to provide an option elsewhere on the field. The rest of your team are also party to this communication, and should respond appropriately. An effect of a good purposeful fake is that the team are brought onto the same page, into sync, and are then able to establish a rhythm to their offence and control the tempo.
c) To move your mark – useful to make a particular throw easier, and often considered the primary reason for faking, sometimes fakes for this purpose are not aimed at viable options and thus can cause miscommunication and disconnection between the thrower and their team mates. When there are enough offensive options available, faking solely for this purpose is no longer productive.
2. Maintain the shape
In the Hex Movement Decision Tree, if you don’t have the disc in your hands then you must ask yourself “Am I in good hex shape?” – to know the answer, you must first know the shape!
Here is a video where I analyse an Australian team (Outbreak) playing Hex, with particular focus on how they should be maintaining shape during the possession.
 The shape (a hexagon) stays the same regardless of the location of the disc – rotating as it nears the sideline in order to keep all players inside the playing field & away from the sideline, as illustrated here. The shape cannot and need not always be perfect during a point, but all players should make efforts and work as a team to maintain the shape when they can, especially if they are not involved in the immediate play.
Some guidelines to help with maintaining shape during a point:
-
- Stay connected – when in good shape, each player is connected to (within 8-12 yards of) three team mates. The distance between any two players in the shape is guided by the team’s average throwing ability, or wind conditions – it should be a comfortable pass if the player moves towards the thrower as quickly as possible, or if they move away from the thrower as quickly as possible (a long pass). The three players connected to the thrower occupy the centre of the comfortable distances the thrower can pass, and keep the same distance away from each other.
- Make triangles – the shape consists of six equilateral triangles, so if players focus locally on maintaining these triangles, the hexagon shape forms naturally.
- Keep equidistant – locally, ensure the triangles are equilateral. These equal distances make it much easier to ensure everyone is connected, and to establish rhythm and tempo control as an offence, as well as setting a standard for pass-length that players can become familiar and comfortable with.
- Avoid the narrow channel – when moving up past a player with the disc, take the path on the wider side of the field – avoid the space between the thrower and the sideline.

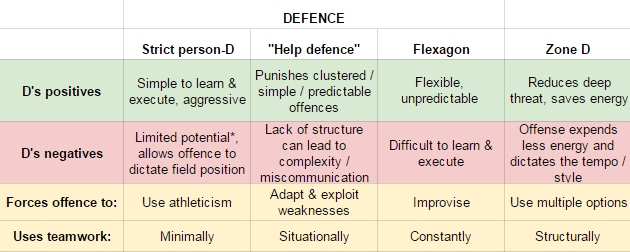
- Don’t surround the disc – against person-to-person marking, surrounding the disc (i.e. having the thrower in the centre of the shape, or having a ‘reset’ on the opposite side of the disc to ‘cutters’) will often lead to turnovers and should be avoided. Against zonal defence, surrounding the disc can be beneficial.
Theoretical shape movement – without defenders, the most efficient way to advance the disc down the field whilst maintaining shape would be to pass the disc down the sideline whilst the hex rotates like a wheel rolling down the line – as illustrated in this animation.
In practice, defenders prevent the most efficient offensive movement, and so although globally the structure effectively rotates as it moves down the sideline, not all local situations will reflect this rotation directly, and players will interchange between positions regularly.
When the disc is passed forwards through the middle, players behind and lateral with the disc must push up to avoid surrounding the disc (whilst avoiding the narrow channel), as illustrated in this animation and this animation.
“Hexagon” technically refers to the shape used in this offence, which could be considered as separate to the disc movement, technique, and style of play this article lays out. For simplicity, I am combining the shape, the movement, the technique and the style in this article and under the name Hexagon Offence, as no other offences currently exist which use the Hex shape (though the positions in Frank Huguenard’s Motion Offence are similar). If plenty more Hex-based offences spring up over time then the combined ideas of shape & movement & technique/style may be renamed to something more personal, such as Shardlow Offence, Felix O, etc.
3. Create space for your team mates, use space as you see it developing
The final part on the Hex Movement Decision Tree reads “Can you create useful space for a teammate?” – knowing the answer to this requires having good spatial and field awareness, and understanding how your teammates can use space which you create. Keep you head up and always be aware of where the defenders and the offensive players are positioned, and, if appropriate, move accordingly. You can create space for your teammates even when you are closely covered, and it is acceptable to distort the shape in order to generate an option.
As space opens on the field, make use of it by moving into it. This also helps your team maintain shape. Take what your defender gives you, or make them give you something you want.
Here’s a clip of UK team SMOG playing Hex at Windmill 2018, where they are applying most of the principles explained above fairly well:
Scoring
Scoring in all Ultimate usually happens in one of two ways: (1) from a deep throw, or (2) from flow towards the end zone. When the disc is around the area of the brick mark, the deep throw is a significant threat, so defenders must not allow the offence players to streak free towards the zone. This allows the offence more chances to be free coming back towards the disc, for shorter passes which can be used to initiate flow. Hardly any turnovers happen when the disc is thrown from near the brick mark.
As the disc gets closer to the end zone, the deep throw is no longer a threat, so the defence can apply more pressure to shorter passes. When flow stops outside the end zone, the odds of the offence scoring decreases significantly.
When in this situation, it is still relatively easy for the offence to initiate flow – if they are moving away from the end zone. The offence should coordinate flowing away from the zone – towards the brick mark – whilst vacating all players from the end zone (staying connected), as this will quickly open up the deep throw again as an immediate scoring option, and put them in a good position to direct their flow back towards the end zone.
The ideal distance to which you should flow away from the end zone depends on the players on your team – far enough so that all defenders are out of the end zone, but not so far that your players cannot reach the end zone with a long throw.
Resources
felixultimate Patreon – Hex training videos released each month to Roo tier patrons, access to livestream analysis archive for all patrons, pledge any amount!
Training Hex Offence with your team – contains some diagrams & descriptions of drills, and tips on how to introduce the offence to your team.
Mex Offence v2.1 – an older version of this doc – more verbose.
Full game footage of Hexagon Offence being played is available at pushpass.co.uk – see any of Brighton City’s games from UKU Nationals 2012/13/14, XEUCF 2013, EUCF 2014, or any Sussex Mohawks 1 or Brighton Panthers games from Uni Regionals 2014. For clips of Hexagon Offence see the Hexagon Ultimate YouTube channel – here are some samples from the channel of Hex in action, taken in 2013.
NB: The play in these videos is by no means a perfect display of Hex, and in the football ones I did get a bit overzealous on drawing triangles over the pitch…
Full drone cam footage of GB U23X v GB Mixed 2015


