

Analysis of 14 passes in flow from US College team Stevens IoT playing Hexagon Offence – 3rd video in the ‘How to play Hex’ series!
Full 3hr analysis session with Stevens Tech: https://www.youtube.com/watch?v=Ufyd8oe0aN8
Also from the How to play Hex series:
Hex Movement Decision Tree: https://www.youtube.com/watch?v=UUTyrYrPCq0
Analysis of Outbreak’s Hex Shape: https://www.youtube.com/watch?v=KvEaqAuN3Cg
Hey everyone!
Here’s some analysis of a US College team playing Hexagon Offence. It came about after I met TJ Stanton at the tryouts for New York Empire – his college coach Jason Thompson was already considering introducing Hex to Stevens Institute of Technology (as well as some other teams he’s involved with), and he knew they had to give it a shot after speaking to TJ.
This footage is from the final of the D3 Metro East Conference Championship, Stevens are in white against the college of New Jersey.
This point involves 14 passes in flow leading up to a score. I’m going to focus first on Stevens’ STRUCTURE and then on their MOVEMENT – not touching too much on their TECHNIQUE.
The three principles in Hex are to maintain shape, sustain flow, and control balance. Let’s stop the video here to look at Stevens’ offensive shape on the field during flow. Here are where their players are, and these are the hex shape points for this disc position near the far sideline. Around five of the seven players are near hex points, and there is no significant overload in any area as the player at the back can fill in here, and this player isn’t too far away from this prong position connected to the disc. 5 out of 7 with no overload is actually pretty good shape, bearing in mind shape is constantly deforming during play and shape maintenance is an ongoing task.
These players are then almost all immediately involved in the play, and although the opportunity for a pass to the near sideline is missed, the central position is filled in from afar and flow is sustained with another quick pass.
If we stop again, let’s look at offensive positioning, and compare to the hex shape points for this disc position. Around four of the team are near to shape points, the three prong positions are pretty much occupied, the only issue is that there is some overcrowding deep.
The fairly good shape facilitates the subsequent good flow. The upline cut has some separation that isn’t cashed in on, and the disc immediately moves across the pitch again. The shape is now really good, just needing small adjustments for the new disc position.
Now let’s look at the movement of the offence. The movement in hex is explained via the hex movement decision tree, which basically says take the first open pass in front of you, and face the centre of the space if nothing is developing.
If we pause here, Chris has just caught the disc and there is no option immediately open in front of him. He will turn immediately to face infield, where the centre of the shape is, which would have been slightly quicker if he had turned inwards rather than outwards after catching.
As the disc moves, Ronnie is moving across the field towards a hex shape point, which would have sustained flow nicely, however he turns away and clears, meaning the option the thrower takes is a little more risky.
If the pass had been made to the sideline and the catcher had turned inwards, they would have also seen the central player quickly, and been able to use them with a pass, or a very effective fake.
As the disc is passed, TJ immediately moves downfield, and provides a stall zero option in the direction the new thrower is facing during their catch.
Flow is sustained as the disc moves to the centre again, and Blake has two options available in front of him. After moving to the side, the disc flows all the way back across the field, continuing its path through the hex shape points smoothly.
Ronnie catches facing the backfield, and should turn inwards to face the centre of the space. He turns outwards but doesn’t waste any energy on an outwards auto-fake (which would be counter-productive for flow), instead finding the central option in good time and keeping the disc moving well.
The score is generated as TJ executes a well timed power move from the back across Kyle’s immediate field of view after catching, and TJ is able to throw whatever he wants towards the end zone for one second.
The stall count does not rise above 3 for the fourteen passes leading up to the score. Stevens’ shape throughout is fairly good, which facilitates their ability to sustain flow and advance the disc forwards both directly and indirectly.
Now, if you’ve been watching this video wondering what on earth I’m going on about when I speak of things like hex shape points, here’s a little explanation of how hexagon offence works:
There are three main elements to all offensive play – structure, movement, and technique. Each are equally important as the other, usually an offence is defined by its structure so that’s what I’ll talk about first.
-Structure:
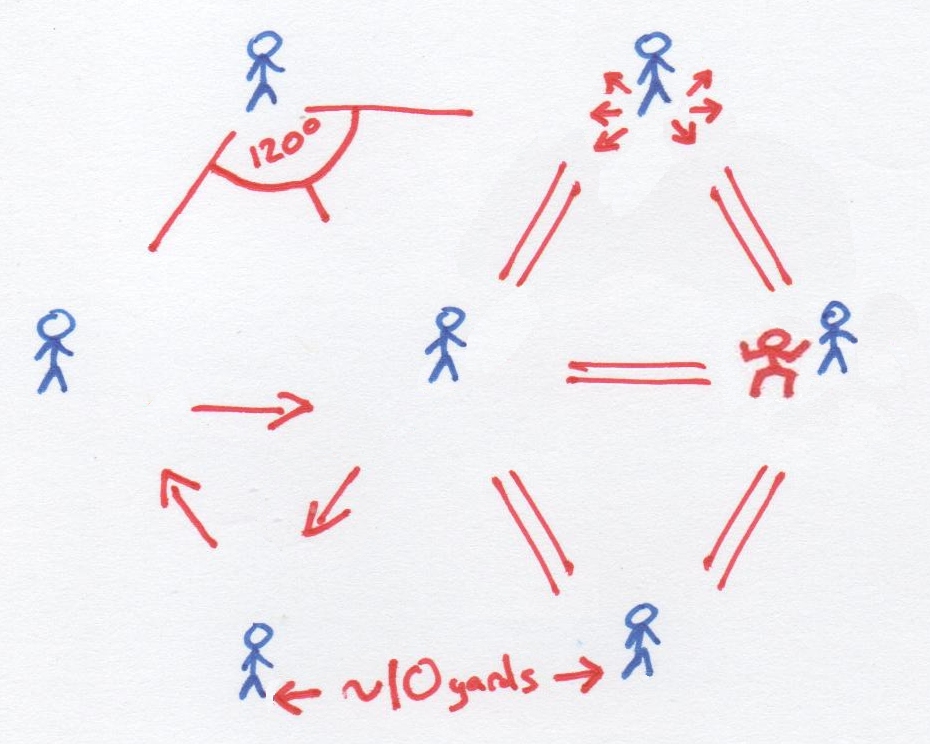
The hexagonal structure is made of equilateral triangles, the points of which are a comfortable distance away from each other – around 12 yards. If it’s windy, or if players are smaller, slower, or can’t throw very accurately over distance, the distance between these points reduces. You want this distance to be comfortable so that a player can sprint towards or away from the disc and be able to receive a pass in stride.
The structure is a shape rather than a formation – as the disc position changes, a formation such as horizontal or vertical stacks will shift and warp, whereas the hex shape stays constant and rotates relative to the available space. The thrower is usually on the edge of the shape, to avoid 1-to-1 defenders surrounding the disc and provide a second level of continuation on a fundamental level. The “hat” is a useful point to keep track of, as it acts as a balance point for the shape, so everyone one the field should be aware of it, maintain it, and build the shape around it. When the disc is on the side, the shape extends perpendicular from the sideline, utilising the space most effectively. The shape will naturally deform during play, so all players should be making efforts to maintain the shape when they are not directly involved in the play around the disc.
In order to best maintain shape, all players should have knowledge of where the hex points are for the disc position, and should each gravitate towards these points. As the disc moves and as the stall count rises, populating the hex shape points will give your team good shape, which facilitates good flow and maximises options. Gravitating towards the hex shape points to occupy them whenever you have any individual down-time is step one, communicating and staying connected to your teammates in order to create good shape as a team is the next level.
These movements to maintain the shape after it has deformed can often be considered as cuts which can be passed to.
-Movement:
The shape is the supporting structure for the movement. The stall count should be kept as low as possible, so the decisions and actions of a player as the disc is coming towards them, when is in their hands, and what they do immediately after it leaves their hands, are critically important to the movement of the offence.
The movement is based around principles and guidelines, rather than cutting orders and patterns.
Movement in hex best explained through the Hex Movement Decision Tree, so check out the video linked in the description below to learn more about that, and expect a video in the future about techniques, such as dribbling, which are best suited to flow-based offences like hex.
Let’s have a quick look at a few more scores from Stevens Tech in this game. Here we see a turnover from TCNJ, Stevens pass the disc quickly and keep it moving by taking the first available options, their shape is pretty good after some initial downfield overloading and they sustain flow fairly well, finishing it off with a long throw to space.
Here you see the hex setup as the disc is walked up after a turnover, TJ in the hat wrongfoots his defender and goes deep, no switch from the defence means a comfortable long throw, Chris has also chased it down and is clear to catch the scoring pass.
Now this is a good move from Ronnie to offer a stall 1 option, when typically the offence and defence would spend the valuable first three seconds of the stall focusing on the area in front of the disc. Instead, each of the poached players is used, and the discs swings to the far side. In particular, a smart defender like Ben Katz would typically poach off Joe here at the back and cause trouble downfield, knowing they won’t be involved in the play for a while, but against hex that doesn’t work as the moving disc finds them very quickly and turns that separation into a threat.
This is similar to the first clip, but in this case TJ comes under towards the hex point to continue flow. He turns inwards and finds a pass to the centre, which is all very nice. The next pass tears open the defence, changing the angle of attack so drastically that is TJ instantly free for the score.
That’s all for now, congrats to Stevens for winning the final, and also congratulations to Belgian team Helgtre who recently got silver at the Belgian National Championships playing hex and flex strategies. Click Subscribe if you haven’t already and I’ll see you again soon!
Felix reacts to Frank’s new video on the Triple Threat Principle – Let’s Be Frank EP2, and digests the key parts of the video.
v 2.34 – July 2021
Concept first published 1st Jan 2013
Older version also available en Français (v2.1)
Hex is a naturally fast-paced offence, which flows organically and is a lot of fun to play. It is easy for beginners to pick up, and liberating for experienced players to play. Here’s what a well played Hex looks like:
If you want to win and have fun, follow these three guidelines:
1. Control your balance (technique)
2. Keep the disc moving (movement)
3. Maintain team shape (spacing)
Players work together as a team to maximise options, meaning there are tons of opportunities to get involved in the play. For beginners this means more disc time, less restrictions, and more fun. For high level teams this means the offence can adapt quickly to defensive change by utilising the spread nature and changing the angle of attack with quick disc movement. Training Hex will typically develop intuitive, well-rounded players who are comfortable with the disc and have a versatile skillset.
Here’s a 35 minute video (available to $1+ patrons) where Felix introduces Hex from scratch – where it came from, why teams are playing it, how it differs from stack, where it’s going, and how it fits into the landscape of modern ultimate frisbee strategy. This video serves as an “academic base” to help players learning hex to gain a fuller understanding and get on the same page as each other. Originally recorded in 2019, remastered for 2021.

Here’s a quick video on how to play hex offence (and flex defence):
If you’d like to introduce Hex Offence to your team, check out this video and join the Training Tier of our Patreon to receive a new training drill video every month!
In terms of individual technique, being in control of your balance whilst catching and throwing means you are in control of your body’s acceleration and deceleration as well as the flow/direction of the disc – a powerful combination!
When used to counter defensive imbalance and/or exploit space, a thrower who is prepared to throw’n’go in any direction after catching can generate flow and penetrate through defensive setups.
There are two basic types of throw: the pivot-throw, and the throw’n’go (or half-pivot). Pivot throws leave the throwers static, throw’n’go moves end with the thrower running. Pivot throws are useful for getting the disc around a defender and adding power, throw’n’go moves are useful for getting separation after releasing the disc, and offering an immediate return option to keep the disc moving. Pivot throws are more suited to low-tempo, isolation-based offences such as side stack, throw’n’go moves are more suited to high-tempo, flow-based offences such as Hex.
When give-go moves are strung together and the active player changes direction with the disc in their hands, this becomes dribbling. When done without travelling, and when supported by an offensive structure that spreads players around the field, dribble moves can be very difficult to stop and can result in uncontested scoring passes. Check out this analysis of Tyler Kinley from Sockeye dribbling against the champions at the time, Revolver:
Sustained flow is very valuable and hard to defend against, so players should take any open pass available to them without hesitation, prioritising keeping the disc moving above gaining yards. The decision tree below is a guideline for how players should move, and where they should look, in order to have the best shot at keeping the disc moving. Hex players should try to internalise this decision tree, as it covers 95% of the situations they will face during a point on the field.

In this video from 2018 I walk viewers through the steps of movement decision tree, and look at a point of hex being played from it’s perspective.
Most offences are defined by their structure (vertical stack, horizontal stack, side stack) as adherence to the structure is of utmost importance to the offence being successful. Hex prioritises quick disc movement, which is facilitated by maintaining good team shape. Players should keep good spacing between each other and the disc throughout their possession, as this will maximise their options for sustaining flow. Locally, players should make equilateral triangles, the overall team shape that forms with 7 players is a hexagon;

When a team focuses on maintaining their shape and keeping the disc moving, they can generate and sustain flow – as explained in this analysis of USA D3 team Stevens IoT;
Players should gravitate towards shape positions during play and when flow has stopped. Most of the off-disc movement in hex is purposeful repositioning to maintain shape and create space for each other, rather than cutting to get the disc or clearing to an inactive area. The shape will deform naturally whenever the disc or players move – it doesn’t need to be perfect, but shape maintenance is an ongoing task for each player which will benefit the team. “Shape Police” can be designated, whose task it is to oversee the shape during a point. The “hat” is the name for the central point in the shape, which dictates where the shape lies on the field relative to the disc. Note that the player in “hat” is expected to change frequently and fluidly during a possession.
The disc should be on the outside of the shape, and as the disc position moves across the field, the shape rotates a full 180 degrees – so when the disc is on the sideline, the central “hat” point is directly towards the centre of the field. In this analysis of Australian club team Outbreak Mountain playing Hex, you can see their shape deforms as their players gravitate towards more traditional areas like where a vertical stack would be, rather than maintaining their spacing and the hex shape;
Combine and train these three elements – technique, movement, and shape – with freedom, creativity, and teamplay – and you’ll not only enjoy training and playing more, but your team will develop faster and start to see great results. Youth coaches in particular often contact us to say their players have begun communicating and working together far more than they have done previously, and are enjoying the discovery process of implementing a more freeform offence. Elite teams are building upon the fundamentals of Hex, training transitions, recurring sequences, and moves which revolve around dribbling and quick disc movement, rather than cutting patterns and orders.
Here’s analysis of Japan using excellent technique, movement, and spacing to score a point against an elite US team at the World Championships:
Once a player learns how to play Hex well, their field awareness and game-sense develops to a point where transitioning to a more conventional, yards-based offence is a relatively easy step, and the two styles can even be combined in the same possession. Teaching players who have learned conventional stack-style for a few years how to play Hex can have it’s challenges, as there are many “fundamentals” which apply to one style but are counter-productive to the other. Traditional drills and techniques are designed with stack-style in mind, so training your team to play Hex means switching to incorporate flow-centric drills, techniques, and exercises. We have many years of experience with training Hex, and have documented a number of tried-and-tested drills and exercises which you can find linked below in our Training program.
You are also invited to join our Discord community ($1/mo pledge), where players and coaches familiar with Hex are actively discussing how to play, challenges during practices, sharing ideas, and asking questions.
When training hex, ensure you are dedicating time to the three main elements of the offence: Technique, Movement, and Shape. Hex (and ultimate itself) are in relatively early stages of development, so there are a limited number of tried-and-tested drills to train hex-style play. The training resources linked below are what we have been using since 2012 to efficiently and effectively train teams to play good hex – the How to Train Hex series should make your life as a coach much easier, and is available to $8/mo Training Tier patrons;

To get Hive Ultimate more directly involved with the development of your team – either to have a 1-to-1 chat, or to collaborate with planning elements of your trainings & your season, check out the higher tiers on Patreon. If you wish your team to all get on the same page at the same time, we can also look into running a Hex Clinic in your city. Email![]() to begin a conversation.
to begin a conversation.
Here’s analysis of Manuela Cardenas from Revolution / Colombia, using throw’n’go techniques and dribbling;
This video shows New Zealand team Hammertron using their shape and balance control to provide multiple options to keep the disc moving;
What is Dribbling, and can it change the way the game is played? Motion Offence pioneer Frank Huguenard tries to explain how he sees it.
Further reading:
Do you still have questions, like: “How does hex handle a defensive look where the main cutting space is covered and cutters are being passed between defenders?” Felix’s Q&A answers that question and more:
Footage taken from multiple different teams over a wide span of years.

Hex Movement Decision Tree: Brief explanation / shortened transcript of video
The way I’ve been looking at offence recently is to break it into three elements; Movement, Structure, and Technique.
This decision tree is a guideline for how to sustain and generate movement of the disc. The left side pertains to movement of the disc, and the right side is more focused on players who are off-disc.
If you have the disc in your hands then you have three questions; Is someone open in front of you?, Is the previous thrower open?, and Can you continue the path of the disc? If the answer is Yes to any of these three questions then you take the open pass, and look for the return pass, before returning to the start of the decision tree. If the return pass is successful then you enter a loop on the top left of the tree, which is where give-go / dribbling moves thrive.
If the answer to any of the three ‘open’ questions is Maybe, then you fake. The answer could be ‘maybe’ because you’re not confident with the distance or type of throw the option is asking of you, or because the defender is half-covering the throw, or for any reason you’re not happy with the option – in this case, fake, and return to asking “Is someone open in front of you?” – which may be the player you just faked an option to.
In some situations it’s better to look to continue the path of the disc before looking back to the previous thrower. Looking back to previous thrower lends itself to a more dribbling-style of Hex, but looking first to continue the path of the disc fits in quite nicely with techniques players have learnt from conventional offences.
If all then ‘open’ answers are ‘No’, then you should face the centre of the space. In Hex, this means you face where the Hat position is (the central player), and you should have all your team mates within your field of view. At this point you return to asking yourself if anyone is open in front of you.
Let’s say you go for the return pass and don’t get the disc back into your hands. The first question to ask yourself is ‘Am I in good hex shape?‘. The details about hex shape / structure are defined in another video, but if you decide you are not in good hex shape then you should reposition – with urgency. Repositioning moves are like cuts, and simply repositioning may well provide the thrower with a viable passing option.
If you are in good hex shape, ask yourself if you are open. If you are, communicate with the thrower by gesticulation or vocalisation, to let the thrower know you are a potential option for them to hit or fake to.
If you aren’t open, see if the thrower is looking at you. If they are, you should try to generate an option for them to either hit or fake to – by moving, or by gesticulating towards space. This will create further options for your team mates.
If you’re in good hex shape, not open, and the thrower is not looking at you, then you should see whether you can create useful space for a team mate. This means looking around to take note of your team mates positions and their defenders relative positions, and working out whether you moving in any direction could create a space, or occupy another defender, which would be useful for your team mate. If you can, then you should generate this option.
If none of these things are the case, then you should chill – don’t stress or feel pressure to create an option, because if everyone on your team is going through the same decision process then the thrower will be faking to half-options, looking at players to generate options, and so on, and the options will come. Continue monitoring the situation to see if you can create useful space for a team mate, to make sure you’re in good hex shape (as a team), and to see if you’re free or if the thrower is looking at you, but aim to become comfortable being in the position of sustaining offensive possession as a team.
Excerpt:
Full stream / extended analysis video:
(c) Felix Shardlow v.1.03 8th July 2021
Also available in French / en Français (v0.97)
Part of a series:
Advanced Flex – Principles in Detail
Advanced Flex Part I: Counter-Strategies
Advanced Flex Part II: Communication
Advanced Flex Part III: The Stall 3 Game-Changer
Be sure to also check out the Flexplanation page which includes videos of the basic concepts of Flex.
Considering sharing this page with your team? Before you do, please first read through the Hive Ultimate Content Sharing Policy, as this page is technically patrons-only.
Flexagon Defence is not a zone, nor is it strictly 1-to-1 defence. Flex employs local positioning guidelines to reduce offensive advantage wherever possible. Where zonal marking utilises role-based teamwork and dynamic positioning; 1-to-1 defence employs simple positioning rules and focuses on athleticism; Flex utilises a set of principles which encourage defenders to work as a team, dynamically recognising any offensive mistakes or inefficiencies and attempting to punish them to gain advantage.
In Ultimate, offence by default has a huge advantage, and if they play very well then it’s very difficult for any defence to stop them from scoring. Actively gaining advantage on defence requires the ability to recognise offensive mistakes, and then utilise a combination of teamwork, positioning, and athleticism to capitalise.

Aim to open a communication channel with nearby teammates as soon as they are within range, so it can be used instantly when opponents move. There are three main ways of opening & using a communication channel:
See, sign, say. Opening a communication channel with your teammates ensures immediate feedback and facilitates learning from each play on the field. Communicating is a valuable skill which can be learned through practice, will help your team get on the same page, and fosters a growth mindset. As players become more familiar with each other, communication moves from vocalisation to gesticulation, and on to the point where simple eye contact will communicate a significant amount of information and initiate teamwork on defence.
Players and teams will naturally develop their own lexicon once they apply the Flex principles and make efforts to communicate. To read more about the specific words and phrases which we have found to be useful in Flex, see Advanced Flex Part II: Communication and Flex Part 4: Communication.
Offensive players who are occupying the same space as each other, or moving towards occupied areas, are making mistakes – be prepared to punish them to gain advantage!
By default, Flex does not involve poaching. Poaching indicates an individual’s decision to leave their mark – this can be applied as an advanced or emergency tactic to good effect, but by default the defence in Flex involves coordinated teamplay, rather than individualistic poaches.
The offensive team have the same number of players as the defence – and one of their players isn’t allowed to move!
Flex doesn’t really have a prescribed shape or formation, as the local positioning of the defenders is entirely dependant upon the positioning of the offensive players. If you find players are marking too much like 1-to-1, not looking for enough switches or surrounding opportunities, then players can be assigned initial positions. Players should be very willing to switch positions mid-point and stick with players 1-to-1 where appropriate, otherwise the defence turns into a zone / poaching, and many of the above principles are broken. Calling positions in Flex should be used as a tool to change the way your team is approaching the defence and get them playing more as a team – conversely, calling 1-to-1 matchups should be used as a tool to stop your players from poaching and apply more individual pressure. A well played Flex sits squarely in-between 1-to-1 and zone, adjusting as the situation dictates.
If the theory of both offence and defence in Ultimate are explored to depths, a hexagon (rotatable 2-3-2) shape emerges as most efficient use of space by 7 players. The hex shape is only utilised in Flex defence in three circumstances:
If a Flex team is surrounding too loosely, blowing switches often, or if poaching becomes an issue, calling initial match-ups on the line can encourage the defence to adopt a more 1-to-1-like mindset.
If calling positions, by default: 2 forwards, 2 wings, 2 backs, 1 hat (central player).
If your opponent is playing horizontal stack it’s recommended you start with person-to-person marking, but if calling positions: 3 forwards, 2 wings, 1 hat, 1 back. For more on playing Flex against specific offensive strategies, see Advanced Flex Part I: Counter-Strategies
The terms “forward” and “back” refer to how you see the field when on the line before a point – “forwards” are comparable to “handler marks”, “backs” are comparable to “deeps”.
Remember that Flex is not a zone, and position calling should only be used in the three situations listed above.
The force – recommended: if the disc is near the middle force middle, if the disc is near the sideline force towards the line – this leaves defenders on either shoulder of the force in all situations. The force is not a critical part of Flex – it can often be left til last when making sure all offensive players are covered, and it can change depending on opponents / conditions. There should certainly not be a player chasing the disc and putting on multiple forces in a row (unless you have incorporated an advanced switching system into your Flex).
Understanding the theory is one thing, but training players to apply the principles in game situations requires focused work at trainings. Felix has been coaching these principles since 2012 and has a number of drills which are effective at developing players communication and field awareness skills so they can effectively switch and surround in game situations. The content is presented in a number of Flex drill videos, which are available on the $8 patreon tier.
Advanced Flex Part I: Counter-Strategies
Advanced Flex Part II: Communication
Advanced Flex Part III: The Stall 3 Game-Changer
Considering sharing this page with your team? Before you do, please first read through the Hive Ultimate Content Sharing Policy, as this page is technically patrons-only.
Zoney Flex in action against FWD at Europeans – fast forward to 37:48:
More recently, Hammertron Prime played a zoney version of Flex at NZ Nationals 2019 (as well as playing Hex Offence):
GB Mixed U23’s played a zoney version of Flex at Worlds in 2015 – below is a video of the first time it was introduced to the team:
Hex/Flex in action against Japan at Worlds:
v 2.21 – 31st August 2018
Concept first published 1st Jan 2013
Also available in French / en Français (v2.1)
Note: Updated (2020) documentation here: https://felixultimate.com/2018/10/14/hexagon-offence-v2-3/
This page is an old version, not all concepts are represented as clearly and concisely as in version 2.31!
Ultimate is a team-based field sport, and as such Movement, Positioning, and Technique/Skillset are the major elements for strategic consideration. Hex Offence’s movement is comparable to Spain’s tiki-taka quick passing style of soccer play. Hex’s positioning is spread like a network – maximising connections between players, and as such maximising options. Technique / skill sets which are suited to Hex include staying balanced and ready to throw or run anywhere at all times, communicating and reacting to your team mates, having spatial and field awareness, and being in control of your acceleration / deceleration at all times.
Hex can be explained through three simple principles:
1. Keep the disc moving (higher value than gaining yards)
2. Maintain the shape (a hexagon)
3. Create space for your team mates, use space as you see it developing
Abiding by these principles creates a fast-moving, flow-based offence which doesn’t give the defence a chance to set, maximises the offensive options available, constantly changes the angles of attack, and is a lot of fun to play.
The flow chart in the video below is a guideline for the decisions you should be making on the field when playing Hex.
Direct link to the Hex Movement Decision Tree image
Ways this style of play differs from conventional offence:
Faking
Some of the decision pathways above are yellow – this means an option isn’t definitely open, but it isn’t definitely marked out either. This could be due to a loose defender, due to not being confident with the type of throw or the distance involved, or any other reason the thrower isn’t totally happy with the option. In this circumstance, fake.
Faking should always be realistic and purposeful. There are three main purposes for faking, in order of importance:
a) To move downfield defenders around – if you have seen a potential option, then the good defenders on the field will also have seen it, so a realistic fake will get them committing to cover this option, and open up other options for the offence elsewhere on the field.
b) To communicate with your team – when you fake to a potential throwing option, you communicate to that player that you have recognised the option they are providing, but that you are not going to throw it for whatever reason. This serves as a prompt for them to provide an option elsewhere on the field. The rest of your team are also party to this communication, and should respond appropriately. An effect of a good purposeful fake is that the team are brought onto the same page, into sync, and are then able to establish a rhythm to their offence and control the tempo.
c) To move your mark – useful to make a particular throw easier, and often considered the primary reason for faking, sometimes fakes for this purpose are not aimed at viable options and thus can cause miscommunication and disconnection between the thrower and their team mates. When there are enough offensive options available, faking solely for this purpose is no longer productive.
In the Hex Movement Decision Tree, if you don’t have the disc in your hands then you must ask yourself “Am I in good hex shape?” – to know the answer, you must first know the shape!
Here is a video where I analyse an Australian team (Outbreak) playing Hex, with particular focus on how they should be maintaining shape during the possession.
 The shape (a hexagon) stays the same regardless of the location of the disc – rotating as it nears the sideline in order to keep all players inside the playing field & away from the sideline, as illustrated here. The shape cannot and need not always be perfect during a point, but all players should make efforts and work as a team to maintain the shape when they can, especially if they are not involved in the immediate play.
Some guidelines to help with maintaining shape during a point:

Theoretical shape movement – without defenders, the most efficient way to advance the disc down the field whilst maintaining shape would be to pass the disc down the sideline whilst the hex rotates like a wheel rolling down the line – as illustrated in this animation.
In practice, defenders prevent the most efficient offensive movement, and so although globally the structure effectively rotates as it moves down the sideline, not all local situations will reflect this rotation directly, and players will interchange between positions regularly.
When the disc is passed forwards through the middle, players behind and lateral with the disc must push up to avoid surrounding the disc (whilst avoiding the narrow channel), as illustrated in this animation and this animation.
“Hexagon” technically refers to the shape used in this offence, which could be considered as separate to the disc movement, technique, and style of play this article lays out. For simplicity, I am combining the shape, the movement, the technique and the style in this article and under the name Hexagon Offence, as no other offences currently exist which use the Hex shape (though the positions in Frank Huguenard’s Motion Offence are similar). If plenty more Hex-based offences spring up over time then the combined ideas of shape & movement & technique/style may be renamed to something more personal, such as Shardlow Offence, Felix O, etc.
The final part on the Hex Movement Decision Tree reads “Can you create useful space for a teammate?” – knowing the answer to this requires having good spatial and field awareness, and understanding how your teammates can use space which you create. Keep you head up and always be aware of where the defenders and the offensive players are positioned, and, if appropriate, move accordingly. You can create space for your teammates even when you are closely covered, and it is acceptable to distort the shape in order to generate an option.
As space opens on the field, make use of it by moving into it. This also helps your team maintain shape. Take what your defender gives you, or make them give you something you want.
Here’s a clip of UK team SMOG playing Hex at Windmill 2018, where they are applying most of the principles explained above fairly well:
Scoring in all Ultimate usually happens in one of two ways: (1) from a deep throw, or (2) from flow towards the end zone. When the disc is around the area of the brick mark, the deep throw is a significant threat, so defenders must not allow the offence players to streak free towards the zone. This allows the offence more chances to be free coming back towards the disc, for shorter passes which can be used to initiate flow. Hardly any turnovers happen when the disc is thrown from near the brick mark.
As the disc gets closer to the end zone, the deep throw is no longer a threat, so the defence can apply more pressure to shorter passes. When flow stops outside the end zone, the odds of the offence scoring decreases significantly.
When in this situation, it is still relatively easy for the offence to initiate flow – if they are moving away from the end zone. The offence should coordinate flowing away from the zone – towards the brick mark – whilst vacating all players from the end zone (staying connected), as this will quickly open up the deep throw again as an immediate scoring option, and put them in a good position to direct their flow back towards the end zone.
The ideal distance to which you should flow away from the end zone depends on the players on your team – far enough so that all defenders are out of the end zone, but not so far that your players cannot reach the end zone with a long throw.
felixultimate Patreon – Hex training videos released each month to Roo tier patrons, access to livestream analysis archive for all patrons, pledge any amount!
Training Hex Offence with your team – contains some diagrams & descriptions of drills, and tips on how to introduce the offence to your team.
Mex Offence v2.1 – an older version of this doc – more verbose.
Full game footage of Hexagon Offence being played is available at pushpass.co.uk – see any of Brighton City’s games from UKU Nationals 2012/13/14, XEUCF 2013, EUCF 2014, or any Sussex Mohawks 1 or Brighton Panthers games from Uni Regionals 2014. For clips of Hexagon Offence see the Hexagon Ultimate YouTube channel – here are some samples from the channel of Hex in action, taken in 2013.
NB: The play in these videos is by no means a perfect display of Hex, and in the football ones I did get a bit overzealous on drawing triangles over the pitch…
(c) Felix Shardlow v.0.1 12th June 2016
Last update: v0.2 – 26th June 2018
Also available in French / en Français
Part of a series:
Advanced Flex – Principles in Detail
Advanced Flex Part I: Counter-Strategies
Advanced Flex Part II: Communication
Advanced Flex Part III: The Stall 3 Game-Changer
For the first 3 seconds of the stall, the offence is looking for flow or continuation options. If the offence is playing well, these options are hard to prevent – nearby defenders should make efforts to contain the offence and prevent flow (or predict it and get a block), whilst other defenders not connected to the play should focus on establishing good positioning. If flow is halted and the stall count hits 3 seconds, the offence will look for a secondary, or reset option. At this point, the defence should already be working as a team to pressure these next options – using switches and sandwiches to ensure every player is marked with good positioning when the thrower looks up after 3 seconds.
After stall 6, the offence will look for their reset or backup options, like a hammer, a break, or a yard-losing pass. All defenders should be minimising separation, or be sandwiching any offensive players who are near to each other – working together to be tight enough to all offensive players to apply pressure to the break/overhead/yard-loser that will be considered at stall 6. Reaching stall 6 doesn’t happen all the time, so the defence can afford to put in extra effort when it does.
If the defenders are all conscious of when the stall count reaches 3 seconds during a point, they can focus their efforts in a coordinated way – using teamwork to attempt to punish the slight offensive error of flow having stopped. By all being on the same page with regard to when / where they should be expending effort, the defence can save energy for the moments when getting interceptions are most likely, and then focus their efforts to generate a block as a team.
The Force should be ‘loose-tight-loose’ over the 10 seconds of the count – for stalls 1-3, the force should be loose and containing – ready to switch to prevent a give-go or up-line cut, and also preventing a ‘killer’ break throw or penetration move.
Stalls 4, 5 and 6 are when the force should be tight and aggressive – stopping the first ‘alternate look’ from the thrower, and applying pressure.
Stalls 7, 8 and 9 are when the force should loosen up a little again – preventing a ‘killer’ break throw and not allowing the thrower to draw a foul to reset the count.
Downfield Defenders should play tight-smart-tight against cutters – they should aim to be tight to their mark when the disc is caught (stall 0), then, if flow is halted, they should be smart and look for sandwiches / switches on stalls 3, 4 and 5, and if the disc still isn’t passed then they should make sure they are tight again at the end of the stall count when the thrower will be looking for the offensive player with the most separation to create an option.
Part of a $1 patron-only series:
Advanced Flex – Principles in Detail
Advanced Flex Part I: Counter-Strategies
Advanced Flex Part II: Communication
Advanced Flex Part III: The Stall 3 Game-Changer
Source video of NexGen-Pony gifs:
https://www.youtube.com/watch?v=GVQ4l3zh73s